基础动画
Unity内置的时间变量
名称
变量类型
描述
_Time
float4
t是场景加载开始持续的时间,变量类型表示为(t/20, t, 2t, 3t)
_SinTime
float4
t是时间的正弦值,分别表示为(t/8, t/4, t/2, t)
_CosTime
float4
t是时间的余弦值,分别表示为(t/8, t/4, t/2, t)
unity_DeltaTime
float4
dt是时间增量,分别表示为(dt, 1/dt, smoothDt, 1/smoothDt)
纹理动画
关键帧图像存放一组动画序列帧的一张贴图
纹理动画的核心在于fragment shader中动态调整读取贴图的位置,计算不同时刻子图像的纹理坐标范围,实现关键帧动画
Shader "ShaderLearning/MakeFrameMove/ImageSequence" { Properties { _Color("Color Tint", Color) = (1 ,1 ,1 ,1 ) _MainTex("Image Sequence", 2 D) = "white"{} _HorizontalAmount("Horizontal Amount", Float) = 4 _VerticalAmount("Vertical Amount", Float) = 4 _Speed("Play Speed", Range(1 ,100 )) = 30 } Subshader { Tags {"Queue"="Transparent" "IgnoreProjector"="True" "RenderType"="Transparent"} Pass { Tags {"LightMode"="ForwardBase"} Zwrite Off Blend SrcAlpha OneMinusSrcAlpha CGPROGRAM #pragma multi_compile_fwdbase #pragma vertex vert #pragma fragment frag #include "UnityCG.cginc" fixed4 _Color; sampler2D _MainTex; float4 _MainTex_ST; float _HorizontalAmount; float _VerticalAmount; float _Speed; struct a2v { float4 vertex : POSITION; float2 texcoord : TEXCOORD0; }; struct v2f { float4 pos : SV_POSITION; float2 uv : TEXCOORD0; }; v2f vert(a2v v) { v2f o; o.pos = UnityObjectToClipPos(v.vertex); o.uv = TRANSFORM_TEX(v.texcoord,_MainTex); return o; } fixed4 frag(v2f i) : SV_Target { float time = floor (_Time.y * _Speed); float row = floor (time/_HorizontalAmount); float colum = time - row * _HorizontalAmount; half2 uv = i.uv + half2(colum,-row); uv.x /= _HorizontalAmount; uv.y /= _VerticalAmount; fixed4 color = tex2D(_MainTex, uv); color.rgb *= _Color; return color; } ENDCG } } FallBack "Transparent/VertexLit" }
本质上就是将原本的0-1的贴图读取范围映射到对应当前帧的范围内
顶点动画
需要关闭批处理,因为顶点动画需要在模型空间下进行顶点位置偏移的计算,批处理会使得所有相关的模型合并,导致这些模型各自的模型空间丢失。
核心在于vertex中对模型顶点进行计算偏移
v2f vert(a2v v) { v2f o; float4 offset = float4(0 , 0 , 0 , 0 ); offset .x = sin (_Time.y * _Frequency + v.vertex.z * _InvWaveLength) * _Magnitude; o.pos = UnityObjectToClipPos(v.vertex + offset ); o.uv = TRANSFORM_TEX(v.texcoord, _MainTex); o.uv += float2(0.0 , _Time.y * _Speed); return o; }
阴影投射Pass:vert中直接把偏移值加到顶点位置变量中,再使用TRANSFER_SHADOW_CASTER_NORMALOFFSET来让unity做剩下的事;frag中直接使用TRANSFER_SHADOW_CASTER_FRAGMENT来让unity自动完成阴影投射
Pass { Tags { "LightMode"="ShadowCaster" } CGPROGRAM #pragma vertex vert #pragma fragment frag #pragma multi_compile_shadowcaster//声明阴影投射的变体 #include "UnityCG.cginc" float _Magnitude; float _Frequency; float _InvWaveLength; struct v2f { V2F_SHADOW_CASTER; }; v2f vert(appdata_base v) { v2f o; float4 offset = float4(0 , 0 , 0 , 0 ); offset .x = sin (_Time.y * _Frequency + v.vertex.z * _InvWaveLength) * _Magnitude; v.vertex = v.vertex + offset ; TRANSFER_SHADOW_CASTER_NORMALOFFSET(o) return o; } fixed4 frag(v2f i) : SV_Target { SHADOW_CASTER_FRAGMENT(i) } ENDCG }
完整代码:
Shader "ShaderLearning/MakeFrameMove/Water" { Properties { _MainTex("Main Texture", 2 D) = "white"{} _Color("Color Tint", Color) = (1 ,1 ,1 ,1 ) _Magnitude("Distortion Magnitude", Float) = 1 _Frequency("Distortion Frequency", Float) = 1 _InvWaveLength("Distortion Inversal Wave Length", Float) = 1 _Speed("Speed", Float) = 0.5 } Subshader { Tags { "Queue"="Transparent" "IgnoreProjector"="True" "RenderType"="Transparent" "DisableBatching"="True" } pass { Tags { "LightMode"="ForwardBase" } ZWrite Off Blend SrcAlpha OneMinusSrcAlpha Cull Off CGPROGRAM #pragma vertex vert #pragma fragment frag #include "UnityCG.cginc" sampler2D _MainTex; float4 _MainTex_ST; fixed4 _Color; float _Magnitude; float _Frequency; float _InvWaveLength; float _Speed; struct a2v { float4 vertex : POSITION; float2 texcoord : TEXCOORD0; }; struct v2f { float4 pos : SV_POSITION; float2 uv : TEXCOORD0; }; v2f vert(a2v v) { v2f o; float4 offset = float4(0 , 0 , 0 , 0 ); offset .x = sin (_Time.y * _Frequency + v.vertex.z * _InvWaveLength) * _Magnitude; o.pos = UnityObjectToClipPos(v.vertex + offset ); o.uv = TRANSFORM_TEX(v.texcoord, _MainTex); o.uv += float2(0.0 , _Time.y * _Speed); return o; } fixed4 frag(v2f i) : SV_Target { fixed4 color = tex2D(_MainTex, i.uv) * _Color; return color; } ENDCG } Pass { Tags { "LightMode"="ShadowCaster" } CGPROGRAM #pragma vertex vert #pragma fragment frag #pragma multi_compile_shadowcaster//声明阴影投射的变体 #include "UnityCG.cginc" float _Magnitude; float _Frequency; float _InvWaveLength; struct v2f { V2F_SHADOW_CASTER; }; v2f vert(appdata_base v) { v2f o; float4 offset = float4(0 , 0 , 0 , 0 ); offset .x = _Magnitude * sin (_Time.y * _Frequency * abs (v.vertex.x) + _InvWaveLength * v.vertex.z); v.vertex = v.vertex + offset ; TRANSFER_SHADOW_CASTER_NORMALOFFSET(o) return o; } fixed4 frag(v2f i) : SV_Target { SHADOW_CASTER_FRAGMENT(i) } ENDCG } } FallBack "VertexLit" }
Billboarding
实现效果:让物体始终正面朝向摄像机
应用场所:面片草
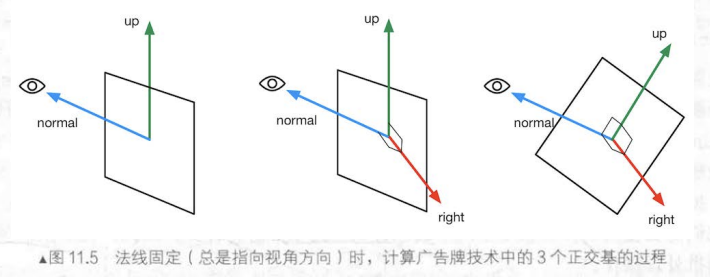
计算原理:
确定物体本地空间的轴朝向
确定物体指向摄像机的方向为物体本地空间的法线(Z轴)朝向,得到确定的normal
通过利用物体本身向上的轴和法线,叉乘计算出物体本地坐标系向右方向的轴朝向,得到确定的right(其中需要判断UpDir会不会和Normal平行,如果平行会导致cross无效)
通过确定的normal和right叉乘计算出确定的up
根据原始位置相对于锚点的偏移量以及三个正交基计算出新的顶点位置(x轴在right轴上投影,y轴在up轴上投影,z轴在normal轴上投影)
Shader "ShaderLearning/MakeFrameMove/BillBoeard" { Properties { _MainTex("Main Texture", 2 D) = "white"{} _Color("Color Tint", Color) = (1 ,1 ,1 ,1 ) _VerticalBillboarding("Vertial Constraints", Range(0 ,1 )) = 1 } Subshader { Tags { "Queue"="Transparent" "RenderType"="Transparent" "IgnoreProjector"="True" "DisableBatching"="True" } Pass { Tags { "LightMode"="ForwardBase" } ZWrite Off Blend SrcAlpha OneMinusSrcAlpha Cull Off CGPROGRAM #pragma vertex vert #pragma fragment frag #include "UnityCG.cginc" sampler2D _MainTex; float4 _MainTex_ST; fixed4 _Color; float _VerticalBillboarding; struct a2v { float4 vertex : POSITION; float2 texcoord : TEXCOORD0; }; struct v2f { float4 pos : SV_POSITION; float2 uv : TEXCOORD0; }; v2f vert(a2v v) { v2f o; float3 center = float3(0 , 0 , 0 ); float3 viewer = mul(unity_WorldToObject,float4(_WorldSpaceCameraPos, 1 )); float3 normalDir = viewer - center; normalDir.y = normalDir.y * _VerticalBillboarding; normalDir = normalize (normalDir); float3 upDir = abs (normalDir.y) > 0.999 ? float3(0 , 0 , 1 ) : float3(0 , 1 , 0 ); float3 rightDir = normalize (cross (upDir, normalDir)); upDir = normalize (cross (normalDir, rightDir)); float3 offset = v.vertex.xyz - center; float3 localPos = center + rightDir * offset .x + upDir * offset .y + normalDir * offset .z; o.pos = UnityObjectToClipPos(float4(localPos, 1 )); o.uv = TRANSFORM_TEX(v.texcoord, _MainTex); return o; } fixed4 frag(v2f i) : SV_Target { fixed4 color = tex2D(_MainTex, i.uv); color.rgb *= _Color.rgb; return color; } ENDCG } } FallBack "Transparent/VertexLit" }
注意事项
顶点动画如果在模型空间下进行计算需要禁用批处理,但因此会带来一定的性能下降,增加Draw Call,因此我们应该尽量避免在模型空间下用一些绝对位置和方向进行计算
顶点动画需要我们自己提供shadowcaster
屏幕后处理
屏幕后处理基本脚本系统
OnRenderImage函数——得到渲染后的屏幕图像
默认在所有的不透明和透明pass被执行完毕后调用
可以在OnRenderImage函数前添加ImageEffectOpaque属性来实现在不透明pass执行完毕、透明pass执行之前调用
Graphics.Blit——完成对渲染纹理的处理
三种声明:
public static void Blit(Texture src, RenderTexture dest); public static void Blit(Texture src, RenderTexture dest, Material mat, int pass = -1 ); public static void Blit(Texture src, Material mat, int pass = -1 );
src表示源纹理
dest表示渲染目标纹理,如果为null则结果会直接输出到屏幕上
mat表示用于渲染的材质
pass默认为-1,表示会依次调用所有的pass,否则会调用特定索引的pass
基类——检测兼容性
using System;
using UnityEngine;
using UnityEngine.UI;

[ExecuteInEditMode]
[RequireComponent(typeof(Camera))]
public class PostEffectsBase : MonoBehaviour
{
    //这个Base类用于处理子类所共有的check和construct material过程

    //在调用start时调用
    protected void CheckResources()
    {
        bool isSupported = CheckSupport();

        if (isSupported == false)
        {
            NotSupported();
        }
    }

    protected bool CheckSupport()//在CheckResource中被调用来查看当前平台是否支持
    {
        if (SystemInfo.supportsImageEffects == false || SystemInfo.supportsRenderTextures == false)
        {
            Debug.LogWarning("This Platform does not support image effects of render textures.");
            return false;
        }

        return true;
    }

    protected void NotSupported()//在不被当前平台支持时调用
    {
        enabled = false;//禁用这个组件
    }

    protected void Start()
    {
        CheckResources();
    }

    protected Material CheckShaderAndCreateMaterial(Shader shader, Material material)//每个屏幕后处理效果通常需要指定一个shader来创建一个用于处理RT的材质,因此在基类提供这样的方法
    //其中参数shader制定了该特效需使用的shader,第二个参数则是用于后期处理的材质
    {
        if (shader == null)
            return null;

        if (shader.isSupported && material && material.shader == shader)//检查shader的可用性,1.isSupported检查shader在当前GPU上是否被支持 2.material检查material是否为空 3.material.shader == shader检查当前材质的shader是否是传入的shader
            return material;

        if (!shader.isSupported)
        {
            return null;
        }
        else
        {
            material = new Material(shader);
            material.hideFlags = HideFlags.DontSave;
            if (material)
                return material;
            else
                return null;
        }
    }
}
基础后处理效果
调整屏幕的HSL
后处理C#脚本:继承自PostEffectBase类的实际效果类模板
using System;
using System.Collections;
using System.Collections.Generic;
using UnityEngine;

public class BrightnessSaturationAndContrast : PostEffectsBase
{
    //声明该效果需要的shader,并由此创建材质
    public Shader briSatConShader;
    public Material briSatConMaterial;
    public Material material//注意看,这是一个属性
    {
        get//get函数调用基类的CheckShaderAndCreateMaterial函数来获得对应的材质
        //get是一个属性或索引器的一部分,返回属性的值或索引器的元素,作用是封装访问字段,提供更好的数据安全性和灵活性
        {
            briSatConMaterial = CheckShaderAndCreateMaterial(briSatConShader,briSatConMaterial);
            return briSatConMaterial;
        }
    }

    //提供调整亮度。饱和度和对比度的参数,并用Range属性提供变化区间
    [Range(0.0f, 3.0f)] public float brightness = 1.0f;
    [Range(0.0f, 3.0f)] public float saturation = 1.0f;
    [Range(0.0f, 3.0f)] public float contrast = 1.0f;

    //定义OnRenderImage来进行真正的特效处理
    private void OnRenderImage(RenderTexture src, RenderTexture dest)//屏幕后处理的基础在于得到渲染后的屏幕图像(抓取屏幕),Unity为我们提供了这样一个方便的接口——OnRenderImage函数
    {
        if (material != null)
        {
            material.SetFloat("_Brightness", brightness);
            material.SetFloat("_Saturation",saturation);
            material.SetFloat("_Contrast",contrast);

            Graphics.Blit(src, dest, material);//在OnRenderImage函数中通常利用Graphics.Blit函数来完成对Render Texture的处理,src纹理将会传递给shader中名为_MainTex的纹理属性
        }
        else
        {
            Graphics.Blit(src, dest);
        }

    }
}
后处理shader:(重点在于fragment shader的处理)
Shader "ShaderLearning/PostProcess/BrightnessSaturationAndContrast" { Properties { _MainTex("Main Texture", 2 D) = "white"{} _Brightness("Brightness", Range(0 ,3 )) = 1 _Saturation("Brightness", Range(0 ,3 )) = 1 _Contrast("Brightness", Range(0 ,3 )) = 1 } Subshader { Pass { ZTest Always Cull Off ZWrite Off CGPROGRAM #pragma vertex vert #pragma fragment frag #include "UnityCG.cginc" sampler2D _MainTex; half _Brightness; half _Saturation; half _Contrast; struct v2f { float4 pos : SV_POSITION; float2 uv : TEXCOORD0; }; v2f vert(appdata_img v) { v2f o; o.pos = UnityWorldToClipPos(v.vertex); o.uv = v.texcoord; return o; } fixed4 frag(v2f i) : SV_Target { fixed4 renderTex = tex2D(_MainTex, i.uv); fixed3 finalColor = renderTex.rgb * _Brightness; fixed luminance = 0.2125 * renderTex.r + 0.7154 * renderTex.g + 0.0721 * renderTex.b; fixed3 luminanceColor = fixed3(luminance, luminance, luminance); finalColor = lerp(luminanceColor, finalColor, _Saturation); fixed3 abgColor = fixed3(0.5 ,0.5 ,0.5 ); finalColor = lerp(abgColor, finalColor, _Contrast); return fixed4(finalColor, renderTex.a); } ENDCG } } FallBack Off }
基于RGB值计算像素亮度信息:
L u m i n a n c e = 0.2125 ∗ r + 0.7154 ∗ g + 0.0721 ∗ b Luminance = 0.2125 *r \ + \ 0.7154*g \ + \ 0.0721 * b
Lu minan ce = 0.2125 ∗ r + 0.7154 ∗ g + 0.0721 ∗ b
高斯模糊
C#代码:(注意其中对Render Texture的内存处理)
public void OnRenderImage(RenderTexture src, RenderTexture dest)
    {
        if (material != null)
        {
            int rtW = src.width / downSample;//降低对原图的采样率,以减少开销;downSample越大性能越好,但是可能会导致图像的像素化
            int rtH = src.height / downSample;

            RenderTexture buffer0 = RenderTexture.GetTemporary(rtW, rtH, 0);
            buffer0.filterMode = FilterMode.Bilinear;//设置纹理的滤波器模式为双线性滤波器

            Graphics.Blit(src, buffer0);//把src的render texture写入buffer0中

            for (int i = 0; i < iterations; i++)//通过for循环控制高斯模糊的迭代次数
            {
                material.SetFloat("_BlurSize", 1.0f + i * blurSpread);//更改用于模糊的像素量

                RenderTexture buffer1 = RenderTexture.GetTemporary(rtW, rtH, 0);//为buffer1分配一个临时RT

                //先处理第一个pass(pass0)--竖直方向的pass
                Graphics.Blit(buffer0, buffer1, material,0);

                RenderTexture.ReleaseTemporary(buffer0);//
                /*如果是使用等号赋值,会造成内存泄露,所以在使用=前需要释放buffer0的内存;但是如果是用Graphics.Blit(buffer0,buffer1,...)的话:
                 ①当Graphics.Blit()接受两个参数时,它会将第一个参数(源纹理)复制到第二个参数(目标纹理),并且会自动释放目标纹理原来占用的内存空间。
                 ②当Graphics.Blit()接受三个参数时,它会将第一个参数(源纹理)经过第三个参数(材质)的处理后复制到第二个参数(目标纹理),并且也会自动释放目标纹理原来占用的内存空间*/
                buffer0 = buffer1;//再将buffer1的结果赋给buffer0,此时buffer1和buffer2指向同一个Render Texture
                buffer1 = RenderTexture.GetTemporary(rtW, rtH, 0);//所以需要为buffer1新指定一个Render Texture

                //处理第二个pass(pass1)--水平方向的pass
                Graphics.Blit(buffer0, buffer1,material,1);

                RenderTexture.ReleaseTemporary(buffer0);
                buffer0 = buffer1;//buffer0和buffer1之后共同指向同一个内存,所以不需要release buffer1
            }

            Graphics.Blit(buffer0, dest);
            RenderTexture.ReleaseTemporary(buffer0);
        }
        else
        {
            Graphics.Blit(src,dest);
        }
Shader代码:
其中==使用了CGINCLUDE 来组织代码==,并且在两个pass中分别计算竖直方向和水平方向的卷积
Shader "ShaderLearning/PostProcess/GuassianBlur" { Properties { _MainTex("Main Texture",2 D) = "white"{} _BlurSize("Blur Size", Float) = 1.0 } Subshader { CGINCLUDE #include "UnityCG.cginc" sampler2D _MainTex; half4 _MainTex_TexelSize; float _BlurSize; struct v2f { float4 pos : SV_POSITION; half2 uv[5 ] : TEXCOORD0; }; v2f vertBlurVertical(appdata_img v) { v2f o; o.pos = UnityObjectToClipPos(v.vertex); half2 uv = v.texcoord; o.uv[0 ] = uv; o.uv[1 ] = uv + float2(0.0 , _MainTex_TexelSize.y * 1.0 ) * _BlurSize; o.uv[2 ] = uv - float2(0.0 , _MainTex_TexelSize.y * 1.0 ) * _BlurSize; o.uv[3 ] = uv + float2(0.0 , _MainTex_TexelSize.y * 2.0 ) * _BlurSize; o.uv[4 ] = uv - float2(0.0 , _MainTex_TexelSize.y * 2.0 ) * _BlurSize; return o; } v2f vertBlurHorizontal(appdata_img v) { v2f o; o.pos = UnityObjectToClipPos(v.vertex); half2 uv = v.texcoord; o.uv[0 ] = uv; o.uv[1 ] = uv + float2(_MainTex_TexelSize.x * 1.0 ,0.0 ) * _BlurSize; o.uv[2 ] = uv - float2(_MainTex_TexelSize.x * 1.0 ,0.0 ) * _BlurSize; o.uv[3 ] = uv + float2(_MainTex_TexelSize.x * 2.0 ,0.0 ) * _BlurSize; o.uv[4 ] = uv - float2(_MainTex_TexelSize.x * 2.0 ,0.0 ) * _BlurSize; return o; } fixed4 fragBlur(v2f i) : SV_Target { float weight[3 ] = {0.4026 , 0.2442 , 0.0545 }; fixed3 sum = tex2D(_MainTex, i.uv[0 ]).rgb * weight[0 ]; for (int it = 1 ; it < 3 ; it++) { sum += tex2D(_MainTex, i.uv[it*2 -1 ]).rgb * weight[it]; sum += tex2D(_MainTex, i.uv[it*2 ]).rgb * weight[it]; } return fixed4(sum ,1.0 ); } ENDCG ZTest Always Cull Off ZWrite Off pass { NAME "GAUSSIAN_BLUR_VERTICAL" CGPROGRAM #pragma vertex vertBlurVertical #pragma fragment fragBlur ENDCG } pass { NAME "GAUSSIAN_BLUR_HORIZONTAL" CGPROGRAM #pragma vertex vertBlurHorizontal #pragma fragment fragBlur ENDCG } } FallBack "Diffuse" }
Bloom效果
实现原理
根据一个阈值提取像素中较亮的区域,将他们存储在一张渲染纹理中,再利用高斯模糊对这张渲染纹理进行模糊处理,模拟光线扩散,再将其和原图像进行混合
使用多个pass进行处理
Pass0:提取高亮部分
Pass1,2:对亮度进行高斯模糊
Pass3:Bloom混合效果
C#代码整体与高斯模糊相似,唯一区别在于进入高斯模糊处理前使用Pass1提取了亮度大于阈值的部分(后续Blit处理的pass依次往后推)
 private void OnRenderImage(RenderTexture src, RenderTexture dest)
    {
        if (material != null)
        {
            ...

            RenderTexture buffer0 = RenderTexture.GetTemporary(rtW, rtH, 0);
            buffer0.filterMode = FilterMode.Bilinear;

-           Graphics.Blit(src, buffer0);
+           Graphics.Blit(src,buffer0,material,0);//第一个pass-->处理提取亮度的过程

            for (int i = 1;i < iterations; i++)
            {
                ...
            }
+           material.SetTexture("_Bloom",buffer0);
-           Graphics.Blit(buffer0, dest);
+           raphics.Blit(src,dest,material,3); //将高斯模糊处理后的亮度图应用到原图上
            RenderTexture.ReleaseTemporary(buffer0);
        }
        else
        {
            Graphics.Blit(src,dest);
        }
    }
Shader代码:
==使用UsePass 来复用之前高斯模糊的Pass==(Pass的名称要使用全大写)
Shader "ShaderLearning/PostProcess/GuassianBlur" { Properties { _MainTex("Main Texture",2 D) = "white"{} _BlurSize("Blur Size", Float) = 1.0 } Subshader { CGINCLUDE #include "UnityCG.cginc" sampler2D _MainTex; half4 _MainTex_TexelSize; float _BlurSize; struct v2f { float4 pos : SV_POSITION; half2 uv[5 ] : TEXCOORD0; }; v2f vertBlurVertical(appdata_img v) { v2f o; o.pos = UnityObjectToClipPos(v.vertex); half2 uv = v.texcoord; o.uv[0 ] = uv; o.uv[1 ] = uv + float2(0.0 , _MainTex_TexelSize.y * 1.0 ) * _BlurSize; o.uv[2 ] = uv - float2(0.0 , _MainTex_TexelSize.y * 1.0 ) * _BlurSize; o.uv[3 ] = uv + float2(0.0 , _MainTex_TexelSize.y * 2.0 ) * _BlurSize; o.uv[4 ] = uv - float2(0.0 , _MainTex_TexelSize.y * 2.0 ) * _BlurSize; return o; } v2f vertBlurHorizontal(appdata_img v) { v2f o; o.pos = UnityObjectToClipPos(v.vertex); half2 uv = v.texcoord; o.uv[0 ] = uv; o.uv[1 ] = uv + float2(_MainTex_TexelSize.x * 1.0 ,0.0 ) * _BlurSize; o.uv[2 ] = uv - float2(_MainTex_TexelSize.x * 1.0 ,0.0 ) * _BlurSize; o.uv[3 ] = uv + float2(_MainTex_TexelSize.x * 2.0 ,0.0 ) * _BlurSize; o.uv[4 ] = uv - float2(_MainTex_TexelSize.x * 2.0 ,0.0 ) * _BlurSize; return o; } fixed4 fragBlur(v2f i) : SV_Target { float weight[3 ] = {0.4026 , 0.2442 , 0.0545 }; fixed3 sum = tex2D(_MainTex, i.uv[0 ]).rgb * weight[0 ]; for (int it = 1 ; it < 3 ; it++) { sum += tex2D(_MainTex, i.uv[it*2 -1 ]).rgb * weight[it]; sum += tex2D(_MainTex, i.uv[it*2 ]).rgb * weight[it]; } return fixed4(sum ,1.0 ); } ENDCG ZTest Always Cull Off ZWrite Off pass { NAME "GAUSSIAN_BLUR_VERTICAL" CGPROGRAM #pragma vertex vertBlurVertical #pragma fragment fragBlur ENDCG } pass { NAME "GAUSSIAN_BLUR_HORIZONTAL" CGPROGRAM #pragma vertex vertBlurHorizontal #pragma fragment fragBlur ENDCG } } FallBack "Diffuse" }
基于颜色亮度的边缘检测
C#代码中只是简单地对shader中一些数值进行调整:
using System;
using System.Collections;
using System.Collections.Generic;
using Unity.VisualScripting;
using UnityEngine;

public class EdgeDetection : PostEffectsBase
{
    public Shader edgeDetectShader;
    private Material edgeDetectMaterial = null;
    public Material material
    {
        get
        {
            edgeDetectMaterial = CheckShaderAndCreateMaterial(edgeDetectShader, edgeDetectMaterial);
            return edgeDetectMaterial;
        }
    }

    [Range(0.0f, 1.0f)] public float edgeOnly = 0.0f;
    public Color edgeColor = Color.black;
    public Color backgroundColor = Color.white;

    private void OnRenderImage(RenderTexture src, RenderTexture dest)
    {
        if (material != null)
        {
            material.SetFloat("_OnlyEdge",edgeOnly);
            material.SetColor("_EdgeColor",edgeColor);
            material.SetColor("_BackgroundColor", backgroundColor);

            Graphics.Blit(src,dest,material);
        }
        else
        {
            Graphics.Blit(src,dest);
        }
    }
}
shader描边关键在于用卷积核计算该像素周围的亮度差作为梯度(模拟二阶导),并基于梯度进行插值计算
Shader "ShaderLearning/PostProcess/EdgeDetection" { Properties { _MainTex("Main Texture", 2 D) = "white"{} _OnlyEdge("Only Edge", Range(0 ,1 )) = 0 _edgeColor("Edge Color", Color) = (0 ,0 ,0 ,1 ) _backgroundColor("Background Color", Color) = (1 ,1 ,1 ,1 ) } Subshader { Pass { ZTest Always Cull Off ZWrite Off CGPROGRAM #pragma vertex vert #pragma fragment frag #include "UnityCG.cginc" sampler2D _MainTex; half4 _MainTex_TexelSize; float _OnlyEdge; fixed4 _EdgeColor; fixed4 _BackgroundColor; struct v2f { float4 pos : SV_POSITION; half2 uv[9 ] : TEXCOORD0; }; v2f vert(appdata_img v) { v2f o; o.pos = UnityObjectToClipPos(v.vertex); half2 uv = v.texcoord; o.uv[0 ] = uv + _MainTex_TexelSize.xy * half2(-1 ,-1 ); o.uv[1 ] = uv + _MainTex_TexelSize.xy * half2( 0 ,-1 ); o.uv[2 ] = uv + _MainTex_TexelSize.xy * half2( 1 ,-1 ); o.uv[3 ] = uv + _MainTex_TexelSize.xy * half2(-1 , 0 ); o.uv[4 ] = uv + _MainTex_TexelSize.xy * half2( 0 , 0 ); o.uv[5 ] = uv + _MainTex_TexelSize.xy * half2( 1 , 0 ); o.uv[6 ] = uv + _MainTex_TexelSize.xy * half2(-1 , 1 ); o.uv[7 ] = uv + _MainTex_TexelSize.xy * half2( 0 , 1 ); o.uv[8 ] = uv + _MainTex_TexelSize.xy * half2( 1 , 1 ); return o; } fixed luminance(fixed4 color) { return -.2125 * color.r + 0.7154 * color.g + 0.0721 * color.b; } half Sobel(v2f i) { const half Gx[9 ] = {-1 , -2 , -1 , 0 , 0 , 0 , 1 , 2 , 1 }; const half Gy[9 ] = {-1 , 0 , 1 , -2 , 0 , 2 , -1 , 0 , 1 }; half texColor; half edgeX = 0 ; half edgeY = 0 ; for (int it = 0 ;it < 9 ;it++) { texColor = luminance(tex2D(_MainTex,i.uv[it])); edgeX += texColor * Gx[it]; edgeY += texColor * Gy[it]; } half edge = abs (edgeX) + abs (edgeY); return edge; } fixed4 frag(v2f i) : SV_Target { half edge = Sobel(i); fixed4 withEdgeColor = lerp( tex2D(_MainTex, i.uv[4 ]), _EdgeColor,edge); fixed4 onlyEdgeColor = lerp( _BackgroundColor, _EdgeColor, edge); return lerp(withEdgeColor,onlyEdgeColor,_OnlyEdge); } ENDCG } } FallBack Off }
使用深度与法线纹理
获取深度与法线纹理
Unity中的深度和法线纹理
深度纹理里的深度范围是[0,1],且因为这些深度来源于NDC,所以通常是非线性分布的
Unity对深度纹理的获取方法:
延迟渲染:直接访问GBuffer
无法直接获取深度缓存时:深度和法线纹理通过一个单独的Pass渲染获得。Unity会使用Shader Replacement着色器替换技术选择那些渲染类型(RenderType)为Opaque的物体,判断他们使用的渲染队列是否小于等于2500(内置的Background、Geometry、AlphaTest均在内),如果满足条件,就把他们渲染到深度和法线纹理中。因此,想要让物体能出现在深度和法线纹理中,就必须在Shader中设置正确的RenderType(<=2500)
可以选择让摄像机生成一张深度纹理或深度+法线纹理
生成一张深度纹理:Unity会直接获取深度缓存,或是使用着色器替换技术,选取需要的不透明物体,并使用它投射阴影时使用的Pass(“LightMode” = “ShadowCaster”)来得到深度纹理。如果shader中不包含这样一个Pass,那这个物体就不会出现在深度纹理中(也不会投射阴影)
生成深度+法线纹理:Unity会创建一张和屏幕分辨率相同、精度为32(8*4)位的纹理,其中观察空间下的法线信息会被编码进纹理的R、G通道中,深度信息会被编码进B、A通道中(在获取法线纹理时,如果是延迟渲染,直接读取GBuffer即可;如果是前向渲染,unity会使用一个单独的Pass把场景再渲染一遍)
如何获取
设置摄像机的depthTextureMode
camera.depthTextureMode = DepthTextureMode.DepthNormals;//获取深度+法线纹理
camera.depthTextureMode = DepthTextureMode.Depth;//获取深度纹理
摄像机的depthTextureMode默认为DepthTextureMode.Depth
shader中采样深度纹理
float sampler = tex2D(_CameraDepthNormalsTexture, i.uv);float d = SMAPLE_DEPTH_TEXTURE(_CameraDepthTexture, i.uv);
当通过纹理采样获得深度值后,这些深度值往往是非线性的,这种非线性来自于透视投影使用的裁剪矩阵。
不过Unity提供了LinearEyeDepth和Linear01Depth两个辅助函数:
LinearEyeDepth负责把深度纹理的采样结果转换到视角空间下的深度值
Linear01Depth会返回一个范围在[0,1]的线性深度值
如果我们需要获得深度+法线纹理,Unity提供了DecodeDepthNormal来为我们获得的采样结果进行解码:
inline void DecodeDepthNormal(float4 enc, out float depth, out float3 normal)
{
    depth = DecodeFloatRG(enc.zw);
    normal = DecodeViewNormalStereo(enc);
}
获得的深度值是[0,1]的线性深度值
得到的法线是视角空间下的法线方向
基于深度和法线的边缘检测
C#中添加了控制采样距离的参数,和控制对深度和法线进行边缘检测时的灵敏度参数
using System;
using System.Collections;
using System.Collections.Generic;
using Unity.VisualScripting;
using UnityEngine;
using UnityEngine.UI;

public class EdgeDetectionWithDepthAndNormal : PostEffectsBase
{
    public Shader EdgeDetectionShader;
    private Material EdgeDetectionMaterial = null;

    private Material material
    {
        get
        {
            EdgeDetectionMaterial = CheckShaderAndCreateMaterial(EdgeDetectionShader, EdgeDetectionMaterial);
            return EdgeDetectionMaterial;
        }
    }

    [Range(0.0f, 1.0f)] public float EdgeOnly = 0.0f;
    public Color EdgeColor = Color.black;
    public Color BackgroundColor = Color.white;
    public float sampleDistance = 1.0f;
    public float sensitivityDepth = 1.0f;
    public float sensitivityNormal = 1.0f;

    private void OnEnable()
    {
        GetComponent<Camera>().depthTextureMode = DepthTextureMode.DepthNormals;
    }

    [ImageEffectOpaque]//标明该属性实现在渲染半透明前就调用此函数进行描边
    private void OnRenderImage(RenderTexture src, RenderTexture dest)
    {
        if (material != null)
        {
            material.SetFloat("_EdgeOnly", EdgeOnly);
            material.SetColor("_EdgeColor",EdgeColor);
            material.SetColor("_BackgroundColor",BackgroundColor);
            material.SetFloat("_SampleDistance",sampleDistance);
            material.SetVector("_Sensitivity",new Vector4(sensitivityNormal,sensitivityDepth,0,0));

            Graphics.Blit(src,dest,material);
        }
        else
        {
            Graphics.Blit(src,dest);
        }
    }
}
其中在OnRenderImage前添加了ImageEffectOpaque属性,实现在渲染半透明前就调用此函数(不给半透明物体描边)
shader中则是使用了Roberts算子,其本质是计算左上角和右下角的差值,乘以右上角和左下角的差值,以此作为评估边缘的依据
Shader "ShaderLearning/PostProcess/EdgeDetectionWithDepthAndNormal" { Properties { _MainTex("Base (RGB)",2 D) = "white"{} _EdgeColor("Edge Color",Color) = (0 ,0 ,0 ,1 ) _BackgroundColor("Background Color", Color) = (1 ,1 ,1 ,1 ) _SampleDistance("Sample Distance", Float) = 1.0 _Sensitivity("Sensitivity(ND00)",Vector) = (1 ,1 ,1 ,1 ) _EdgeOnly("Edge Only", Float) = 0 } Subshader { CGINCLUDE #include "UnityCG.cginc" sampler2D _MainTex; half4 _MainTex_TexelSize; fixed4 _EdgeColor; fixed4 _BackgroundColor; float _SampleDistance; vector _Sensitivity; sampler2D _CameraDepthNormalsTexture; fixed _EdgeOnly; struct v2f { float4 pos : SV_POSITION; half2 uv[5 ] : TEXCOORD0; }; v2f vert(appdata_img v) { v2f o; o.pos = UnityObjectToClipPos(v.vertex); half2 uv = v.texcoord; o.uv[0 ] = uv; #if UNITY_UV_STARTS_AT_TOP if (_MainTex_TexelSize.y < 0 ) uv.y = 1 - uv.y; #endif o.uv[1 ] = uv + _MainTex_TexelSize * half2(1 , 1 ) * _SampleDistance; o.uv[2 ] = uv + _MainTex_TexelSize * half2(-1 , -1 ) * _SampleDistance; o.uv[3 ] = uv + _MainTex_TexelSize * half2(1 , -1 ) * _SampleDistance; o.uv[4 ] = uv + _MainTex_TexelSize * half2(-1 , 1 ) * _SampleDistance; return o; } half CheckSame(half4 center, half4 sample ) { half2 centerNormal = center.xy; float centerDepth = DecodeFloatRG(center.zw); half2 sampleNormal = sample .xy; float sampleDepth = DecodeFloatRG(sample .zw); half2 diffNormal = abs (centerNormal - sampleNormal) * _Sensitivity.x; int isSameNormal = (diffNormal.x + diffNormal.y) < 0.1 ; half2 diffDepth = abs (centerDepth - sampleDepth) * _Sensitivity.y; int isSameDepth = abs (diffDepth.x + diffDepth.y) < 0.1 ; return (isSameDepth * isSameNormal) ? 1.0 : 0.0 ; } fixed4 fragRobertsCrossDepthAndNormal(v2f i) : SV_Target { half4 sample1 = tex2D(_CameraDepthNormalsTexture, i.uv[1 ]); half4 sample2 = tex2D(_CameraDepthNormalsTexture, i.uv[2 ]); half4 sample3 = tex2D(_CameraDepthNormalsTexture, i.uv[3 ]); half4 sample4 = tex2D(_CameraDepthNormalsTexture, i.uv[4 ]); half edge = 1.0 ; edge *= CheckSame(sample1, sample2); edge *= CheckSame(sample3, sample4); fixed4 withEdgeColor = lerp(_EdgeColor, tex2D(_MainTex, i.uv[0 ]), edge); fixed4 onlyEdgeColor = lerp(_EdgeColor, _BackgroundColor, edge); return lerp(withEdgeColor, onlyEdgeColor, _EdgeOnly); } ENDCG Pass { ZTest Always ZWrite Off Cull Off CGPROGRAM #pragma vertex vert #pragma fragment fragRobertsCrossDepthAndNormal ENDCG } } FallBack Off }


